Wednesday 16 July 2014

Roofing...

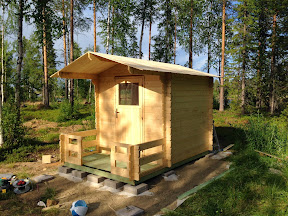
Finally the felt is installed on the roof and the play house starts to look complete. The edges of the felt in front and back need trimming, and some more planks need attaching, but it's getting there now. The final job will be painting.

The felt came in precisely precut sheets of a metre in length. They are installed in such a way, that they overlap to give the impression of tiles. They are nailed to the roof underneath, and the nails must be placed where they will be covered up by the next layer. The work always goes from the outer edge of the roof up to the summit, so that water cannot penetrate between the layers.

The material has a plastic sheet at the back, which must be peeled off first, and then the sheet will stick to the under underneath. The heat of the Sun makes the melt together, or then one can use a heat gun to speed things up when rain is approaching — like tonight.


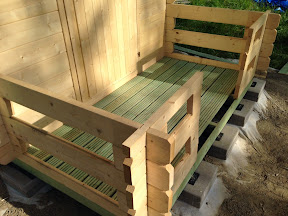
This is what the house looks like now. Besides the roof, the floor boards of the terrace need some fine tuning at the entrance, and the railing around the terrace will get a flat top. Then we'll be done.

Sunday 13 July 2014

Play house: Floor - tick; roof - tick ...

Today our play house got its floor and roof. First we jacked up the three inner foundation beams to make sure they are level. A little padding and all is good. Then we installed the floor of the terrace, and then the floor inside (photos above and below, respectively).

In order to allow the wooden structure to move a bit over time, gaps must be left between the panels of 1-1.5 mm and 5 mm around the edges. The gaps between the floor boards of the terrace are about a centimetre wide.

This gave us good ground for a ladder in order to put the roof panelling in place. Starting from front to back, and one side at a time, the panels were installed — again making sure that there's a 1-1.5 mm gap between the individual panels.

What about the diagonal beam under the roof? As explained in yesterday's blog post despite all care, the whole structure was skewed and while both diagonals at the bottom were as precisely the same as can be (to 1 mm), at the top the diagonals differed by some 2 cm! This was fixed by putting the beam in place after cutting it to exactly the correct length of the diagonal. Once installed, both diagonals matched also at the top.

Now that everything is in place and the roof is on, the tension's gone elsewhere and the diagonal beam is lying loose without any pressure on it, secured by a few nails.

This is what it looks like now, after completion of this stage.

Finally a photo of Our House as seen from inside the play house. Tomorrow we plan to continue with putting the bitumen tiles on the roof and possibly giving the play house a first coat of primer paint in order to protect it from the elements.

By the way, the play house is a kit marketed as "Lillevilla 209" or "Lillevilla Playhouse 4", a product from Finland, which is available elsewhere in Europe, too.

Saturday 12 July 2014

Building a play house


Finally, the play house project is taking shape. We bought a kit in late May, and began by surveying the location. We used concrete tiles as foundations, and it is very important to get all tiles exactly to the correct height, or otherwise the log construction will be skewed. We also put down a large sheet of geotextile to prevent vegetation from growing under the house.

The next step was to put down five foundation beams of wood, and the first layer of logs on top of that. Here, again, it is very important to have everything level, and to be absolutely sure that both diagonals are of the same length, or otherwise the house will not have right angles and things like window and door won't fit properly. So it takes ages to do all the preparations, but after that it's great fun to see the house grow — a process that we have filmed with our GoPro Hero 2 camera at one image per 5 seconds.


Have a look at the resulting time-lapse film, which is just over a minute long. Enjoy!


The final photo above shows what it looks like now. The cargo lashings inside are needed, because despite all accuracy with getting everything aligned just right, wood is a natural material and everything was slightly off direction and needed careful nudging into the right place.


Sunday 6 July 2014

Day 70: Painting Our House

This summer we have finally began to paint Our House. The weather this summer has been very variable, and bad weather and weekends seem to be highly correlated. Thus the progress is slow, but it's still looking good after only three days on the job.

On Day 68, the vertical columns and the horizontal beam under the roof were primed, and parts of the railing got their first coat of paint.

Almost at the end of Day 69, large parts of the western face of the house had received the first coat of red paint. Finally the final look became apparent: the classic combination of dark red paint for the walls, and white for the window frames.

The factory name of the colour scheme we chose for our house reflects just how traditional these colours are: "Mummola" ("granny's house"). The colours are Tikkurila 526X (red) and 603X (white).

Today (Day 70), we painted the lower part of the south face of the house, which turned out to be a somewhat tedious job, since there are three narrow sections with horizontal panels between windows, door, and at the corner.

We had a GoPro Hero 2 taking photos every 10 seconds during painting and made a short time-lapse film of it. The above image is a composite of the first and last images of the time-lapse sequence.

Finally, here's a photo of what it looks like now while writing this blog post. The gable as well as all wooden panels under the roof overhangs will have to wait until we have rented a cherry picker in order to work safely and efficiently.