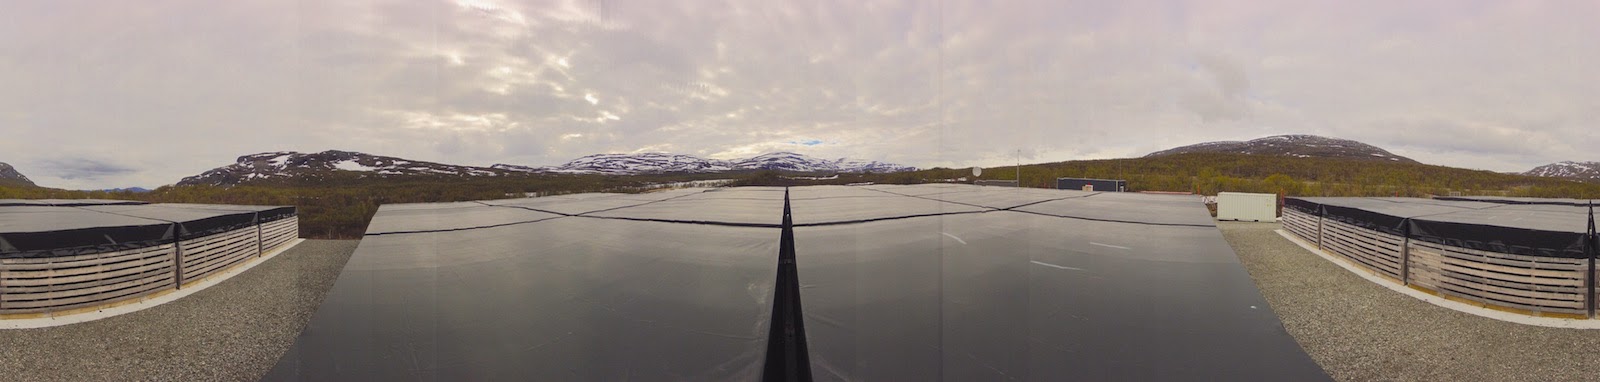
Previously, I wrote about how a time-lapse camera on a rotating egg timer can lead to a pan-lapse film and a stripy 360° panorama. However, one can push this game even further. The above image type is also know as "little planet," since there's sky all around a landscape photograph.
It is essential to make the left and right edges of a panorama match exactly to get the impression of a continuous image. The above image was created from the "cloudy sky" stripy panorama of KAIRA. The image was loaded into the open-source image manipulation software Gimp, and then turned into this circular panorama using the distortion filter "polar co-ordinates." It's a pretty cool effect.
Of course one can crop it just so as to get rid of the white corners. Alternatively there's another distortion filter "lens correction," which can instead stretch the sky into the corners, but it leads to some artefacts I didn't like, so I opted for cropping instead.
Here's the result of the same operation on the "sunny" stripy panorama of KAIRA. Since the centre of both panoramas point in different direction, I used an additional feature of Gimp's polar co-ordinate filter, which let's me rotate the circular image just the way I want it, i.e. with the fell of Saana at the top. Here you can see very clearly the different shades caused by the automatic exposure of the GoPro camera.
Photos and editing: Thomas Ulich.
A related article is on the KAIRA blog.
Mi•Vyoo ['my view] pl Mi•Vyoos, mi vyoos about life and through the lens. Antonym: Yoor•Vyoo.
Showing posts with label GoPro. Show all posts
Tuesday, 5 August 2014
Sunday, 3 August 2014
Stripey Panorama

On the next day, the weather was much nicer, and I repeated the egg-timer photography. However, due to the GoPro camera's fully automagic exposure settings, and the high variability in lighting caused by fast moving clouds and the bright Sun, it was not possible to make a nice pan-lapse out of these photos, and as you can see, the stripiness is much more pronounced in this image, even though the blue sky is very nice of course.
By the way, the strange black boxes in these photos are part of the Kilpisjärvi Atmospheric Imaging Receiver Array (KAIRA). The mountain directly under the Sun in the second photo is famous Saana.
In due time I will write about how these were done in detail, in case you want to try yourself.
You can click on the above images to get larger versions.
Original photos and panoramas: Thomas Ulich.
Another article about this you can find on the KAIRA blog.
Labels:
GoPro,
KAIRA,
panorama,
photography,
SGO
Location:
99490 Kilpisjärvi, Finland
Friday, 1 August 2014
Pan-Lapse Film
In late June, I went to Kilpisjärvi on a service mission to Finland's largest radio telescope, the Kilpisjärvi Atmospheric Imaging Receiver Array (KAIRA), which was built there by our institute, the Sodankylä Geophysical Observatory. The first thing I did upon arrival, was to place a GoPro time-lapse camera on an egg timer, in order to make a full 360° panoramic time-lapse film (YouTube).
Do you want to know how I did it? Then read on...
The GoPro cameras (Hero 2 above) have excellent optics for what they are, since they have a fixed focal length (no zoom) and also have fixed focus. Thus the extreme wide-angle lens needs to do only one thing and is optimised for that. Also, the GoPros have a built in time-lapse mode, i.e. they can take 11MP or 5MP images at a number of set intervals between half a second and one minute.
The cheapest way to make rotating time-lapse films is to mount the camera on a cheap (about 4€ or so) IKEA egg timer. The timers do a full 360° rotation in one hour, which is a good duration for a time-lapse. The only negative point is that they can only rotate in one direction (unless turned upside down).
For the film above, I programmed the camera to take a photo every 10 seconds, and set the timer to 60 minutes. Thus the camera was set to take one image per one degree of rotation. Rather arbitrarily, I decided then to use these images to stitch them together to 360° panoramas by using twelve 30° sections. These sections are indicated by the grey lines in the image at the top. Thus I needed to take every 30th image and see how much they overlap, and cut away the overlapping parts in order to have only the 30° centre sections. Then I stitched the 12 images together, 30 images apart, leading to a 360° view.
Now, since the camera took a photo for every degree of rotation, I made 360 different panoramas, each shifted by one degree with respected to the previous. These were then combined into a full panoramic time-lapse film, also called a pan-lapse film.
If you look carefully when watching the film (e.g. look at the clouds), you will see that the same bit of film repeats in every pane and migrates from left to right through all panes. In other words, every pane is a 30-image time-lapse film, repeated through all twelve panes, and thereby making up a film of 360 frames. The film looks really nice when put on loop, but this is unfortunately not possible on YouTube.
There are a few other games one can play with this set of images, so watch this space!
By the way, I got the idea of pan-lapse films from Ken Murphy of Murphlab, please visit his site for this and other exciting time-lapse projects.
Photos and time-lapse film: Thomas Ulich.
Another blog post was published about this on the KAIRA blog today.
Do you want to know how I did it? Then read on...
The GoPro cameras (Hero 2 above) have excellent optics for what they are, since they have a fixed focal length (no zoom) and also have fixed focus. Thus the extreme wide-angle lens needs to do only one thing and is optimised for that. Also, the GoPros have a built in time-lapse mode, i.e. they can take 11MP or 5MP images at a number of set intervals between half a second and one minute.
The cheapest way to make rotating time-lapse films is to mount the camera on a cheap (about 4€ or so) IKEA egg timer. The timers do a full 360° rotation in one hour, which is a good duration for a time-lapse. The only negative point is that they can only rotate in one direction (unless turned upside down).
For the film above, I programmed the camera to take a photo every 10 seconds, and set the timer to 60 minutes. Thus the camera was set to take one image per one degree of rotation. Rather arbitrarily, I decided then to use these images to stitch them together to 360° panoramas by using twelve 30° sections. These sections are indicated by the grey lines in the image at the top. Thus I needed to take every 30th image and see how much they overlap, and cut away the overlapping parts in order to have only the 30° centre sections. Then I stitched the 12 images together, 30 images apart, leading to a 360° view.
Now, since the camera took a photo for every degree of rotation, I made 360 different panoramas, each shifted by one degree with respected to the previous. These were then combined into a full panoramic time-lapse film, also called a pan-lapse film.
If you look carefully when watching the film (e.g. look at the clouds), you will see that the same bit of film repeats in every pane and migrates from left to right through all panes. In other words, every pane is a 30-image time-lapse film, repeated through all twelve panes, and thereby making up a film of 360 frames. The film looks really nice when put on loop, but this is unfortunately not possible on YouTube.
There are a few other games one can play with this set of images, so watch this space!
By the way, I got the idea of pan-lapse films from Ken Murphy of Murphlab, please visit his site for this and other exciting time-lapse projects.
Photos and time-lapse film: Thomas Ulich.
Another blog post was published about this on the KAIRA blog today.
Labels:
egg timer,
GoPro,
KAIRA,
pan-lapse,
photography,
SGO,
time-lapse
Location:
99490 Kilpisjärvi, Finland
Saturday, 12 July 2014
Building a play house
Finally, the play house project is taking shape. We bought a kit in late May, and began by surveying the location. We used concrete tiles as foundations, and it is very important to get all tiles exactly to the correct height, or otherwise the log construction will be skewed. We also put down a large sheet of geotextile to prevent vegetation from growing under the house.
The next step was to put down five foundation beams of wood, and the first layer of logs on top of that. Here, again, it is very important to have everything level, and to be absolutely sure that both diagonals are of the same length, or otherwise the house will not have right angles and things like window and door won't fit properly. So it takes ages to do all the preparations, but after that it's great fun to see the house grow — a process that we have filmed with our GoPro Hero 2 camera at one image per 5 seconds.
Have a look at the resulting time-lapse film, which is just over a minute long. Enjoy!
The final photo above shows what it looks like now. The cargo lashings inside are needed, because despite all accuracy with getting everything aligned just right, wood is a natural material and everything was slightly off direction and needed careful nudging into the right place.
Sunday, 6 July 2014
Day 70: Painting Our House
This summer we have finally began to paint Our House. The weather this summer has been very variable, and bad weather and weekends seem to be highly correlated. Thus the progress is slow, but it's still looking good after only three days on the job.
On Day 68, the vertical columns and the horizontal beam under the roof were primed, and parts of the railing got their first coat of paint.
Almost at the end of Day 69, large parts of the western face of the house had received the first coat of red paint. Finally the final look became apparent: the classic combination of dark red paint for the walls, and white for the window frames.
The factory name of the colour scheme we chose for our house reflects just how traditional these colours are: "Mummola" ("granny's house"). The colours are Tikkurila 526X (red) and 603X (white).
Today (Day 70), we painted the lower part of the south face of the house, which turned out to be a somewhat tedious job, since there are three narrow sections with horizontal panels between windows, door, and at the corner.
We had a GoPro Hero 2 taking photos every 10 seconds during painting and made a short time-lapse film of it. The above image is a composite of the first and last images of the time-lapse sequence.
Finally, here's a photo of what it looks like now while writing this blog post. The gable as well as all wooden panels under the roof overhangs will have to wait until we have rented a cherry picker in order to work safely and efficiently.
On Day 68, the vertical columns and the horizontal beam under the roof were primed, and parts of the railing got their first coat of paint.
Almost at the end of Day 69, large parts of the western face of the house had received the first coat of red paint. Finally the final look became apparent: the classic combination of dark red paint for the walls, and white for the window frames.
The factory name of the colour scheme we chose for our house reflects just how traditional these colours are: "Mummola" ("granny's house"). The colours are Tikkurila 526X (red) and 603X (white).
Today (Day 70), we painted the lower part of the south face of the house, which turned out to be a somewhat tedious job, since there are three narrow sections with horizontal panels between windows, door, and at the corner.
We had a GoPro Hero 2 taking photos every 10 seconds during painting and made a short time-lapse film of it. The above image is a composite of the first and last images of the time-lapse sequence.
Finally, here's a photo of what it looks like now while writing this blog post. The gable as well as all wooden panels under the roof overhangs will have to wait until we have rented a cherry picker in order to work safely and efficiently.
Labels:
colour schemes,
GoPro,
Our House,
painting,
time-lapse
Location:
99600 Sodankylä, Finland
Thursday, 21 March 2013
Day 47: Final Paint for Fireplace
On Day 46 (16th March), it was time for the final coats of paint for the fire place. First the whole thing was painted in an off-white colour ("Damasti"). This had to be applied twice, some three hours apart. The photo above shows the first coat of paint.
Finally, in the evening, the firewall part above the fireplace was painted in the same brown tone as the wall on the other side of the chimney ("Etruski"), and this was repeated by a second coat of brown on Sunday morning (Day 47, 17th March). The photo shows the final product, the fireplace stands out nicely against the contrast of the dark wall.
Since the weather was just brilliant, there was a chance and time to play with the extreme wide-angle GoPro camera. Above is a shot that would be hard to achieve with other cameras, a view that shows all kitchen/living room windows and the terrace door at once.
No, our windows are actually perfectly straight, but when going very close to the window with the GoPro, the extreme wide angle distorts the window frame. A nice view in any case.
Finally, in the evening, the firewall part above the fireplace was painted in the same brown tone as the wall on the other side of the chimney ("Etruski"), and this was repeated by a second coat of brown on Sunday morning (Day 47, 17th March). The photo shows the final product, the fireplace stands out nicely against the contrast of the dark wall.
Since the weather was just brilliant, there was a chance and time to play with the extreme wide-angle GoPro camera. Above is a shot that would be hard to achieve with other cameras, a view that shows all kitchen/living room windows and the terrace door at once.
No, our windows are actually perfectly straight, but when going very close to the window with the GoPro, the extreme wide angle distorts the window frame. A nice view in any case.
Location:
99600 Sodankylä, Finland
Thursday, 17 January 2013
Day 12: House Deployed
Today was the big day: Our House, which we spotted already last night parked up in front of a service station in the village, was deployed onto its foundations. Work began with the arrival of a large crane, and the first lorry with a house module showed up at 08:00 h. Another lorry arrived shortly afterwards.
The first module to be deployed contained the geothermal heat pump and hot water reservoir, and therefore it took some time to get the pipes fed into it before lowering it into its final location. Also, precisely lining up the first module is more difficult, the later modules are just placed a given distance from the first.
After the arrival of the second module, the plastic covers were removed and Our House revealed its interior for the first time. At the same time, a class of construction students from the local Lapland Vocational College showed up in order to see the construction process live.
There was a break, because the lorries had to return to their trailers, where another crane moved the other two house modules onto the lorries. This became necessary, because the dirt road to Our House has a narrow right-angle bend, and the site was out of reach of the trailers. Soon these modules arrived and were lifted onto the foundations. By lunch time, the house looked complete, with only the roof missing.
Another lorry arrived and brought all kinds of smaller elements, which are needed to complete the house. These include the steps leading up to the entrance doors, the small roof above the back door, the front porch floor, and the triangles for the roof. Nice to see the stairs, I guess there's no doubt who lives here...
It took less than an hour to put up all the roof triangles, plus another hour or so for the outer wall triangles at both ends of the building, which was completed only after dark and therefore above is the intermediate stage.
As one can guess from the photos, the weather was stunning again. Blue skies, a great sunrise and sunset, at temperatures of only –20°C, which is rather warm for blue-skies conditions in January. However, the registration plate of the crane looked very appropriate for these Arctic conditions.
A summary of the today's action is available as a time-lapse film, taken with a GoPro camera at one photo per 5 seconds from 08:15 h to 16:15 h resulting in a short film of 3'30" duration (the lunch break cut out). Enjoy!
The first module to be deployed contained the geothermal heat pump and hot water reservoir, and therefore it took some time to get the pipes fed into it before lowering it into its final location. Also, precisely lining up the first module is more difficult, the later modules are just placed a given distance from the first.
After the arrival of the second module, the plastic covers were removed and Our House revealed its interior for the first time. At the same time, a class of construction students from the local Lapland Vocational College showed up in order to see the construction process live.
There was a break, because the lorries had to return to their trailers, where another crane moved the other two house modules onto the lorries. This became necessary, because the dirt road to Our House has a narrow right-angle bend, and the site was out of reach of the trailers. Soon these modules arrived and were lifted onto the foundations. By lunch time, the house looked complete, with only the roof missing.
Another lorry arrived and brought all kinds of smaller elements, which are needed to complete the house. These include the steps leading up to the entrance doors, the small roof above the back door, the front porch floor, and the triangles for the roof. Nice to see the stairs, I guess there's no doubt who lives here...
It took less than an hour to put up all the roof triangles, plus another hour or so for the outer wall triangles at both ends of the building, which was completed only after dark and therefore above is the intermediate stage.
As one can guess from the photos, the weather was stunning again. Blue skies, a great sunrise and sunset, at temperatures of only –20°C, which is rather warm for blue-skies conditions in January. However, the registration plate of the crane looked very appropriate for these Arctic conditions.
A summary of the today's action is available as a time-lapse film, taken with a GoPro camera at one photo per 5 seconds from 08:15 h to 16:15 h resulting in a short film of 3'30" duration (the lunch break cut out). Enjoy!
Labels:
GoPro,
Our House,
time-lapse
Location:
99600 Sodankylä, Finland
Subscribe to:
Posts (Atom)